A Quick Breakdown of Nested and Shared Families
Share
Using nested and shared families is quite a simple process, however, for new Revit users or even just users that haven’t explored the power of this process, it can initially be a little daunting. Once you understand these features of Revit you will wonder how you ever lived without them, and not only that, the possibility of endless customisations of many of the RevitHQ families’ opens up to you.
To begin with, let’s break down the terms nested and shared, how they are different, and why you should utilize these powerful features.
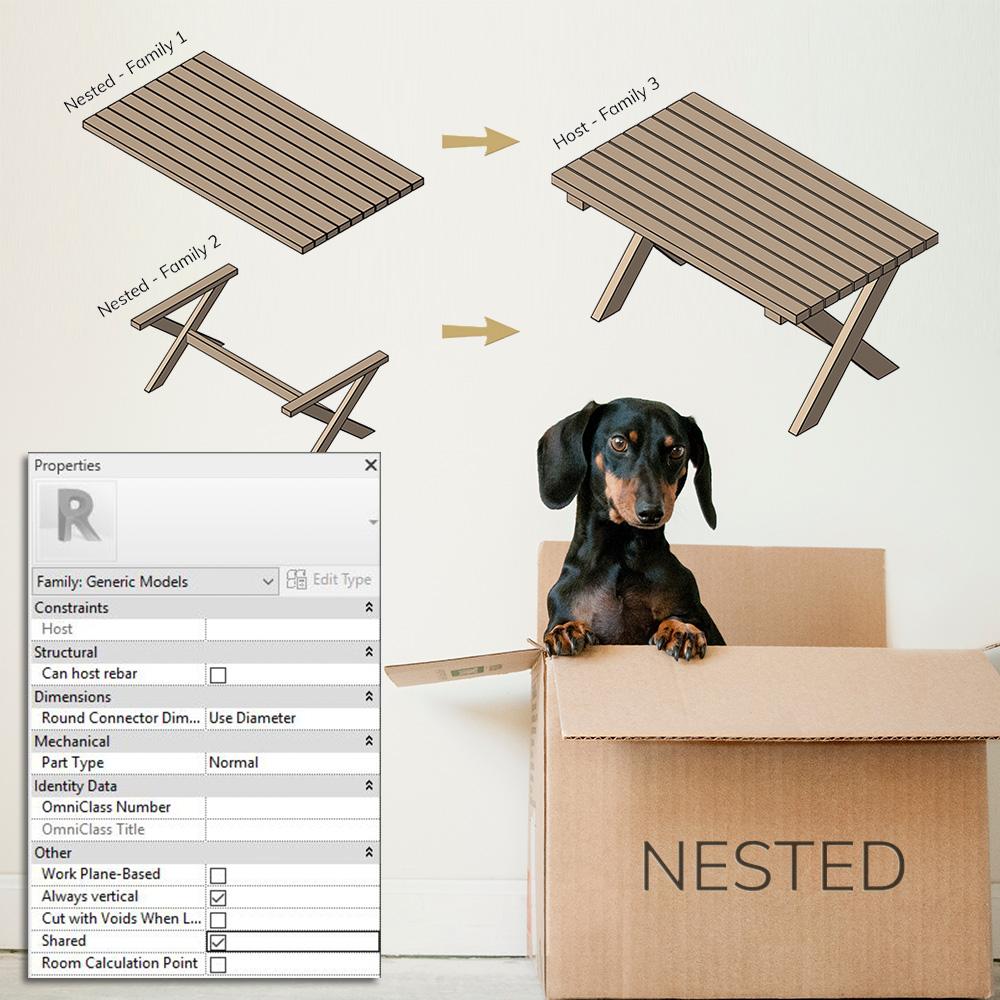
Nested Families: A term used for a family that is 'nested' in another family. When the host family is inserted into a project, it will be the only family that is loaded in.
Shared Families. A term used for a family has had the 'shared' tickbox enabled in its properties. When shared families are nested in a host family, and that host family is inserted into a project, both the host family and the nested family will be visible in the project browser.
Nested Families
To reiterate, nested families are families that have been ‘nested’ in other families, exactly like it sounds. Any good family creator will utilise nested families. They greatly simplify the family creation process by compartmentalising different elements of the model. An example of this could be a table, the legs of the table could be created in one family, the tabletop in another family, and the two could then be combined in a third family.While it would be possible to model both of these nested elements in the same family. Using this method would mean:
- All the constraints, reference planes and equations that make the table base won’t interfere with the tabletop, and vice versa.
- Any updates to the tabletop or base can be made without the fear of affecting other modelled elements.
- Anyone unfamiliar with the model can easily perform error analysis with significantly more ease.
Furthermore, any parameter created in these nested families, whether they be instance-based or type-based, can then be linked to the parameters in the hosting family. Thereby giving you the ability to either use their constraints in equations or have their size influence other nested families.
To do this, insert your nested family into your host family and navigate to the type or instance property you wish to link.
Linking can be achieved by selecting the small grey box next to parameter, and clicking this box will take you through the standard process of creating a new parameter. After this is done, the equal symbol will appear in the grey box as shown in the example below.
Now that the link has been made the nested family parameter is being controlled by the new parameter in your host family.
Head to the family types dialogue box to find your newly created parameter and begin adding some equations. Or simply insert your host family into your project and begin flexing the linked parameter.
Shared Families

But it can also be found in the properties bar when no objects are selected.
Any family can be made into a shared family, but it will have a number of effects that are very important to be aware of.
- To begin with, shared families are what they sound like, shared. By making a nested family shared, it will also be loaded into you project along with the host family, visible in your project browser like any other family. It essentially becomes a family that can be adjusted and placed independent of its host if needed, while simultaneously existing in the host family.
- Any updates to the nested and shared family can be done straight from the project by editing the family from the project browser, propagating those changes to any instance in you project.
- This nested and shared family can be used in multiple host families, meaning any changes made will update to all host families.
- Nested and shared families can be scheduled independent of their host families.
- Nested and shared families can be selected and tagged in your project, independently of its host family. An example of this would be tagging your door handle and lock in elevation, separate to the door tag. This will even work for nested and shared families of different categories. To do this, use the tab key when hovering the mouse over the family to cycle through its shared components, then select or tag as needed.
Shared Families Points of Confusion
I made my family shared and loaded it in but how do I change it back to just a standard family?

Be cautious when making a family shared. For a family can be edited, made to be shared, and loaded back into your project or family, but once shared it is more difficult to un-share. The 'shared' tick box is easy enough to deselect, but the problem comes when reloading the family back into the project, as seen in the error shown right.
The reason for this, I believe, is most like due the implications un-sharing a family can have on multiple host families that might be using the same nested and shared family. If you wish to un-share a family, it must be first completely removed from the project or family, and then reloaded in. A pain when you have already used it in multiple locations.
I've made my family shared, loaded it into my host family, but can’t link the type parameters.
When in the family editor environment and nesting a shared family in a host family, the type properties of the nested families won’t be able to be linked. Only the instance properties of a nested family will be able to be linked. This doesn’t mean that you shouldn’t use type parameters in the nested and shared families; type parameter will still be adjustable in the type settings of the family when inserted into your project. We will cover this in more detail in another post, as it is a great way to compartmentalize large amounts of adjustable parameters, reducing complexity and increasing customization potential.
Advanced use of Nested and Shared Families

This is a very powerful feature of nested and shared families and is a feature that many RevitHQ families take full advantage of.
However, certain requirements need to be met for this to be achieved:
- A ‘Family Type’ parameter needs to be set up in the host family for the nested and shared component you wish to swap in and out, see left.
- Any linked instance parameters need to match the family that is intending on being swapped in and out. The easiest way to achieve this is to duplicate a family that is currently nested and shared and resave. Using an already established family as a starting point will mean your instance parameter naming is identical.
- The origin point of nested and shared families being swapped in and out should be identical.
- Any newly created reference planes in a nested and shared family should be set to ‘not a reference’. This is not an absolute requirement, and there may be instances where you would like to use the reference planes to dimension to in a project. However, in the host family Revit can on occasion mistake these reference planes for the origin reference plane, leading to nested family in a position it is not meant to be.
The detailed procedure for the creation of custom nested and shared families for RevitHQ families can be found on the RevitHQ ‘Creating Nested & Shared Families’ page. This uses the door family as an example, but the process detailed there is useful for creation of your own custom families too.


1 comment
This helped me very much. Thank you for sharing your knowledge. Best regards.